Chat Dialogues
Last updated: August 2026
1. Exporting and Importing Chat Dialogs for Translation
To translate the coaching content, you first need to export the chat dialogs into an Excel file, where the translations will be entered. Once the translations are completed, you can re-import the translated file into the system.
1.1 Exporting Chat Dialogs and Variables
1.1.1 Navigate to the coaching intervention to be translated
- Navigate to your coaching intervention and select it by clicking on it.
- Make sure it is completely deactivated (monitoring and coaching status inactive).
- Click on the button
internationalisation: You will see an interface labeled "Localisation of coaching "Name of coaching intervention", followed by the date and time of the current coaching intervention.
1.1.2 Export the data to be translated
Minimal export timestamp (empty = complete export): If you want to export all data, leave this field empty. If you wish to export only data that was added or edited after a specific time, enter the timestamp here. This might be the case if you added dialogues after the coaching intervention was already translated and you want to export only the recently added dialogues.
The timestamp should be entered as a Unix timestamp, which represents the number of seconds since January 1, 1970. You can use this Unix Timestamp Converter to easily convert dates to Unix timestamps and vice versa.
Export Messages & Dialogs: Click this button to export all the chat messages and dialogs. This will generate an Excel file containing the content that needs to be translated.Export Coaching Variables: Use this option to export all the variables listed in the tab "Variables". These variables might include text or terms that are used across dialogs and need to be translated.Export Surveys & Feedbacks: Legacy.
For the process of the translation, please read the section below "Guidelines for Translations of the Chat Dialogues" before starting to translate the exported files.
1.2 Importing Translated Files
Once you have completed the translations in the exported Excel file, you can re-import it into the system:
1.2.1 Navigate to the original coaching intervention
- Navigate to your original coaching intervention (from which you generated the export for translation) and select it by clicking on it.
- Make sure it is completely deactivated (monitoring and coaching status inactive).
- Click on the button
internationalisation: You will see an interface labeled "Localisation of coaching "Name of coaching intervention", followed by the date and time of the current coaching intervention.
1.2.2 Import the translated data
Import Messages & Dialogs: Click this button to upload and import the translated messages and dialogs.Import Coaching Variables: Use this option to upload and import translated coaching variables.Import Surveys & Feedbacks: Legacy.
1.3 Final Steps
After importing, double-check the system to ensure that the translations have been correctly integrated and that no formatting or alignment issues are present.
2. Guidelines for Translations of the Chat Dialogues
2.1 Do Not Alter Specific Columns
- Columns A and B: These columns contain crucial information that should not be modified.
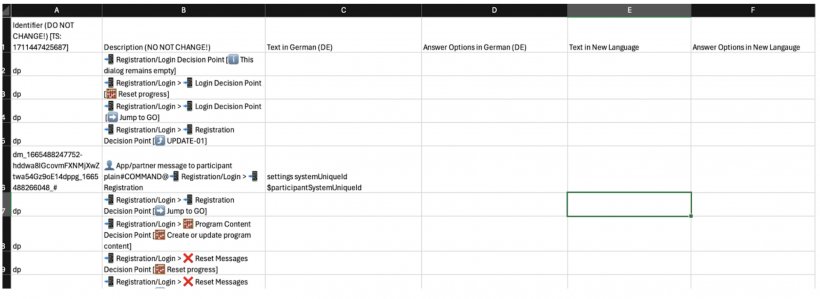
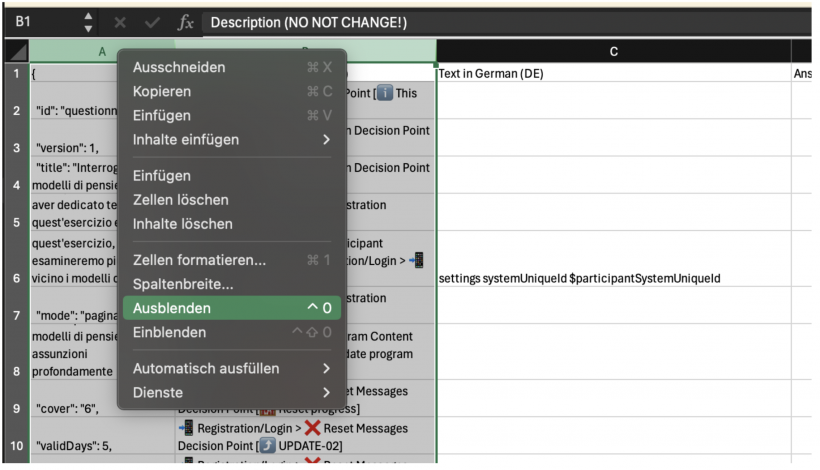
Tip: It's recommended to hide at least column A to prevent accidental changes.
2.2 Maintain Alignment of Original and Translated Texts
- Correct Alignment: Ensure that the original text and its translation are always in the same row.
2.3 Preserve Formatting
Ensure that all formatting, including spaces and line breaks, is retained in the translation.
- Example of correct formatting ✅:

- Example of incorrect formatting:

Be sure to use the Bubble Spacer
---without any spaces before or after otherwise it is rendered in the bubble as it is
2.4 Do Not Translate English Terms (Commands)
Never translate English terms; always keep them in the original language as these are usually technical commands or variables (unless the original dialogue text is in English).
- Example of correct translation of a command ✅:

- Example of incorrect translation of a command:

- Never translate variables (variables are words starting with "$") ✅:

- Example of incorrect translation of variables:

3. Guidelines for Requesting Content Changes via the String Export
The String Export is not only used for translation — customers also use it to request textual changes to their coaching content, for example rewording a coach message, shortening a dialogue, or removing an answer option. This section explains how to make these kinds of edits safely, since the same file is later re-imported and matched back row by row to the live coaching intervention.
3.1 What the String Export Looks Like
The String Export is an Excel/Sheets file with one row per chat bubble (a coach message or a set of answer options). The example below shows the typical structure: column A holds the technical identifier, column B a short description, followed by one "Text" column per language and one "Answer Options" column per language. Answer options within a cell are listed one per line in the format Option text:value (e.g. Mehr Sport treiben:1).
3.2 Small Text Edits Are Safe to Make Directly
- Minor wording changes, typo fixes, or swapping/adding an emoji can be made directly in the relevant cell.
- Keep the existing formatting intact — line breaks,
---separators between bubbles, and spacing — see "Preserve Formatting" above.
3.3 Never Add or Delete Rows Yourself
Never add or delete a row in the String Export yourself. Each row is matched back to the coaching intervention via the identifier in column A — adding or removing rows breaks this mapping and can corrupt the import.
- Want to add a new bubble (a coach message or an answer option)? Note it in the source document (e.g. the Word file describing the dialogue) and flag it to add the corresponding row in the String Export. After reimporting the Stringexport to the Coaching Editor you can manually add a new bubble.
- Want to remove an answer option or an entire bubble? Do not delete the row or the answer option yourself — see "Marking Content for Deletion" below.
3.4 Marking Content for Deletion
If an answer option or a bubble should be removed, insert a short, searchable marker (e.g. <todo delete>) at the start of the relevant cell instead of deleting it. This makes it easy to search for the marker after the file is re-imported and remove the corresponding bubble in the system.
- Also note the row number (and, if relevant, which language columns are affected) when reporting the change, so it can be located quickly.

3.5 Reserved Characters in Answer Options
- Do not use colons within the answer option text itself (e.g.
Here’s the thing: I already know!:1is incorrect) — colons are reserved by the system to parse the value after the answer option. Replace them with a dash or similar. - After the colon, only a number is allowed, with no space and no emoji (e.g.
Dies ist eine Antwortoption A:1).
3.6 Reserved Commands — Do Not Delete
- Commands such as
<todo>mark rows that still need attention (e.g. for translation). Be careful before deleting these. - Media commands such as
show-linkorshow-backpack-linkcan be swapped directly in the String Export (e.g. to update a video ID or link) — just keep the exact format.