App Screens
App screens allow you to create your own screens for your app or to overwrite existing ones. Some screens have a unique identifier that is reserved for preconstructed screens (e.g. media-library, daily-plan, etc.). These screens also have a reserved name and cannot be renamed. Identifiers — both predefined and custom ones — are used to navigate between screens by referencing them.
Each screen can have an icon assigned to it, which will be shown on buttons that link to that screen. A localized screen title completes the essential data needed to define a screen. Optionally, you can choose to show a specific screen in the menu, which creates an entry point to your app screen directly from the navigation.
But let's explore this step by step...
1. Creating Own Screens
To create your own screen, simply add one in the CoachStudio Designer. Choose a unique alphanumeric identifier (e.g. my-faq-screen) that is not reserved by the system (see "Default Screens"), as well as an icon and title. Then decide if...
- your screen shall be directly shown in the menu — check the appropriate option for this
- or your screen shall only be reachable by linking to it from another screen using a screen button (see "Content Elements")
1.1 Default Screens
Some screens exist as special system screens that can be overwritten. To replace one, simply assign your own screen the corresponding specific identifier and your page will replace the default one in the app:
- account (Account & Settings Screen)
- privacy-policy (Privacy Policy Screen)
- more (The regular more page in the tab bar menu)
- legal (The Data Protection & Legal Screen, also containing links to licenses and the privacy policy)
- security (Security Screen)
- daily-plan (Daily Plan for reminders)
- media-library (Media Library for videos, audios, links and infocards)
1.2 Filling the Screen Content
Filling a screen with content is done entirely through the CoachStudio Designer. Don't worry — there is a live preview on the right side so you always know how your configuration looks.
The screen content is defined as a JSON array containing all elements that shall be shown on the screen. The available content element types and their configuration options are explained in the following sections.
1.3 Using Variables in Screens
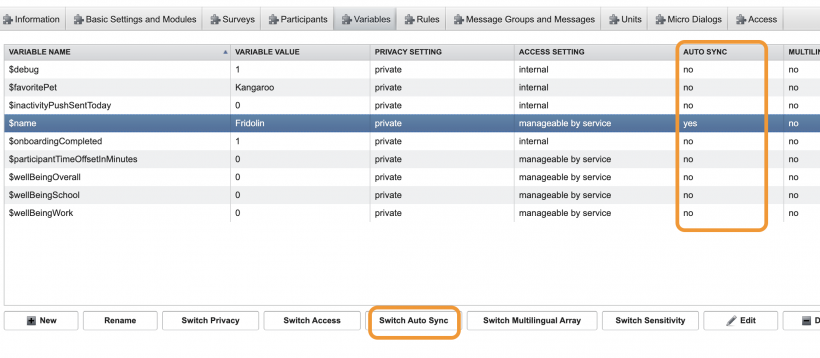
Variables from the server can be used within screen content — for example inside Markdown text, screen titles, or other text fields. To make a variable available in CoachStudio Designer, it must be set to Autosync in the Coaching Editor. Once Autosync is enabled, the server automatically synchronizes the variable's value with CoachStudio Designer whenever it is updated.
In the CoachStudio Designer, click on "Refresh variables" to load the latest synced variables. You can then select the variable from the dropdown and use it in your screen content.
Make sure that the correct coaching is selected under "Basics" - "Coaching Selection"

Variables can be referenced in any supported text field — such as Markdown blocks or screen titles — using the variable's name.
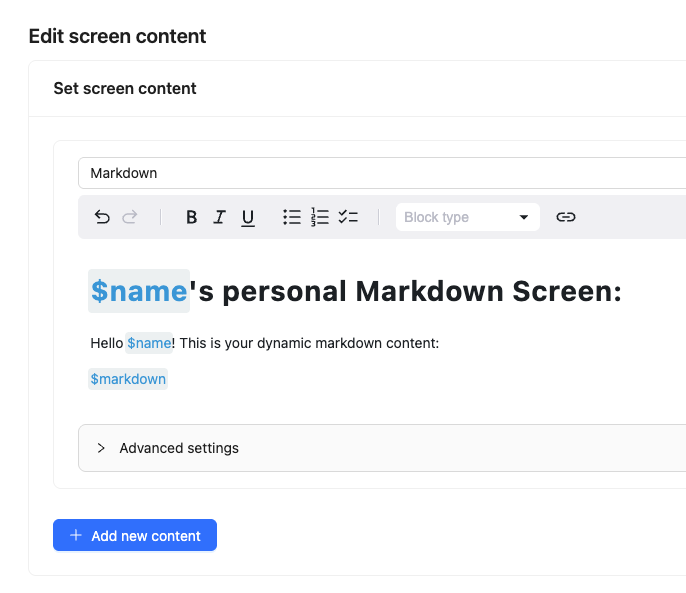
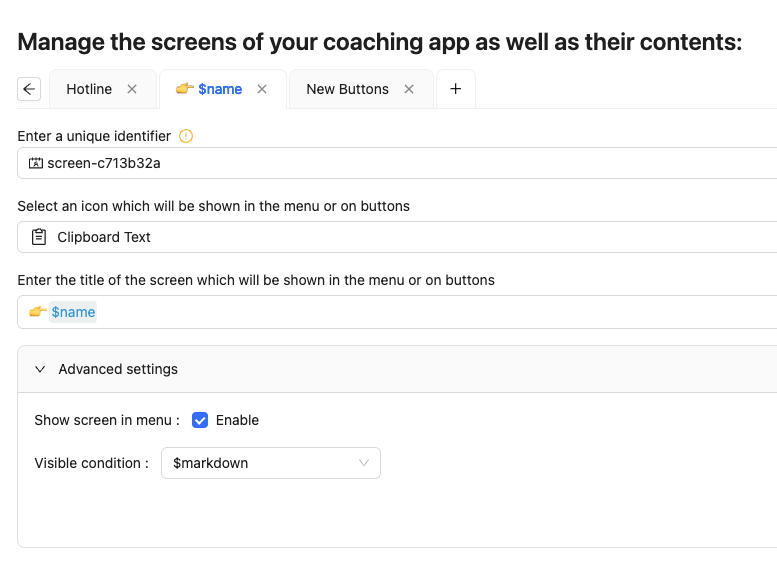
Note: Whenever an autosynced variable is written with a new value, it is immediately synced to the app.
2. Content Elements
All available screen content elements are explained below. They can be used in any combination, and the order in the app always matches the order in the content array. Make sure to provide all readable texts in localized formats — at least in the primary language of your app, but ideally in all supported languages.
When adding a new content element via the dropdown menu in the CoachStudio Designer, the following types are available:
- Markdown – formatted text block
- Collapsible Markdown – expandable/collapsible text block
- Button – a screen navigation button
- Link Button – a button that opens a URL or triggers an intent
2.1 Conditions
Each content element can optionally have a condition assigned to it. A condition is based on a server variable (see "Using Variables in Screens") and controls whether the element is visible to the user. The system evaluates the condition as true if the variable value is not undefined, null, empty, or 0. If none of these apply, the element is shown.
2.2 Markdown Block
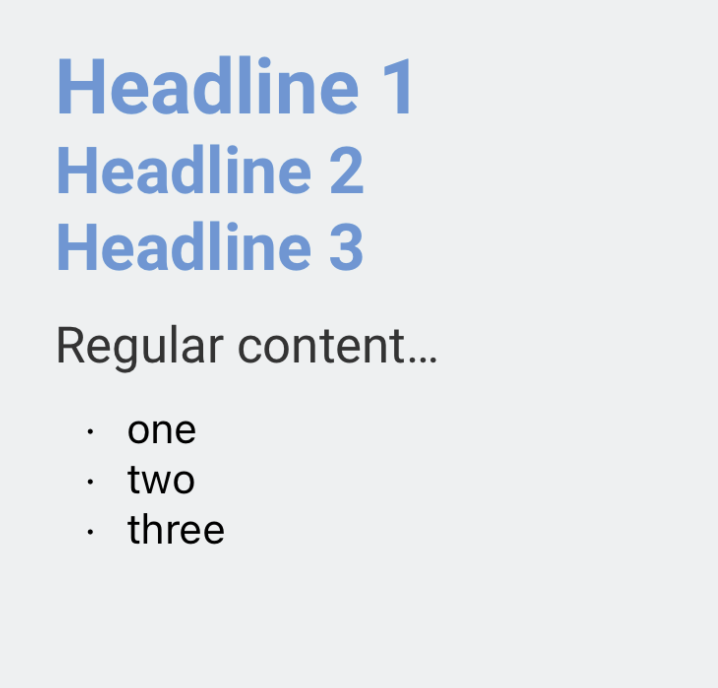
An element to provide formatted text in the app, written in Markdown syntax. The following formatting is supported:
- Headlines via
#,##and### - Listings via
*or- - Links via
[link text](url)— the link text goes in square brackets, the URL in parentheses - Line breaks do not require 3 spaces — a
\nis sufficient
{
  "type": "md",
  "content": {
    "values": {
      "en_GB": "# Headline 1\n## Headline 2\n## Headline 3\nRegular content...\n\n* one\n* two\n* three"
    }
  }
}
2.3 Collapsible Markdown Block
The collapsible Markdown block lets you provide expandable content sections, as commonly known from FAQs. Each block has a title that the user can tap to expand or collapse the content below. Apart from this behaviour, it works the same way as the regular Markdown block.
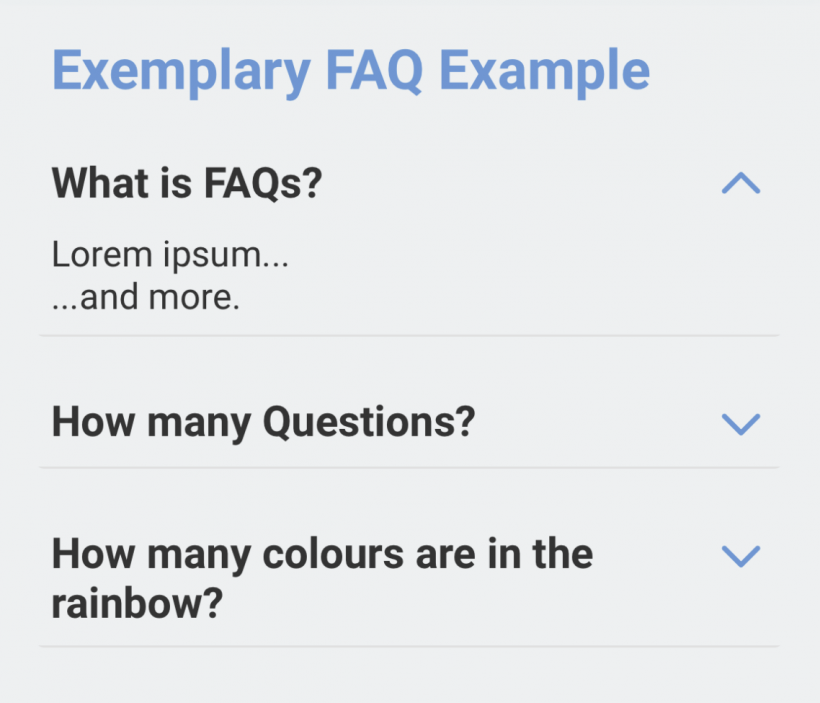
{
  "type": "collapsable_md_block",
  "title": {
    "values": {
      "en_GB": "What is FAQs?"
    }
  },
  "content": {
    "values": {
      "en_GB": "Lorem ipsum...\n...and more."
    }
  }
}
2.4 Screen Button
A button that links to another screen. You can use identifiers of your own screens or the following pre-defined identifiers for existing default app pages:
- account (Account & Settings Screen)
- privacy-policy (Privacy Policy Screen)
- more (The regular more page in the tab bar menu)
- legal (The Data Protection & Legal Screen, also containing links to licenses and the privacy policy)
- security (Security Screen)
- daily-plan (Daily Plan for reminders)
- media-library (Media Library for videos, audios, links and infocards)
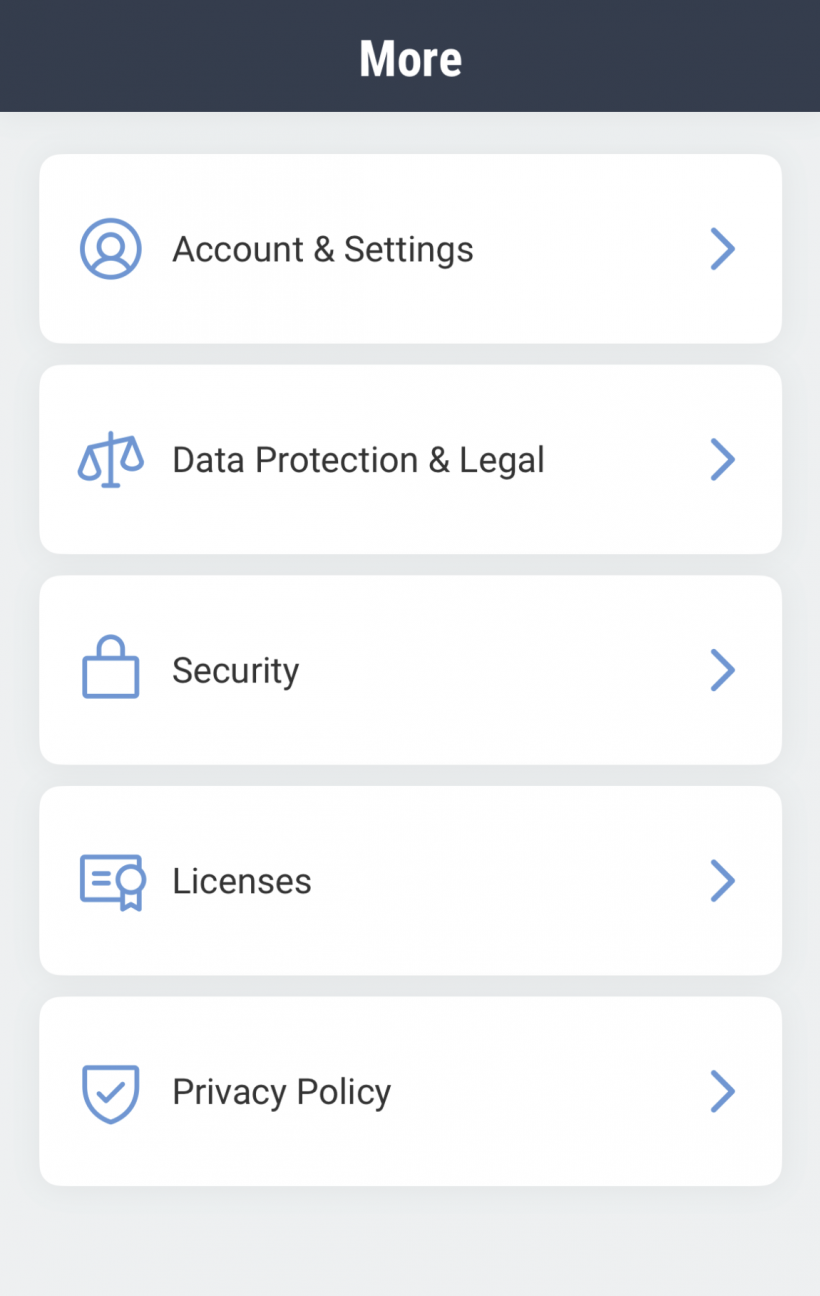
{
  "type": "screen_button",
  "screenId": "account"
}
{
"type": "screen_button",
"screenId": "my-faq-screen"
}2.5 Image Button
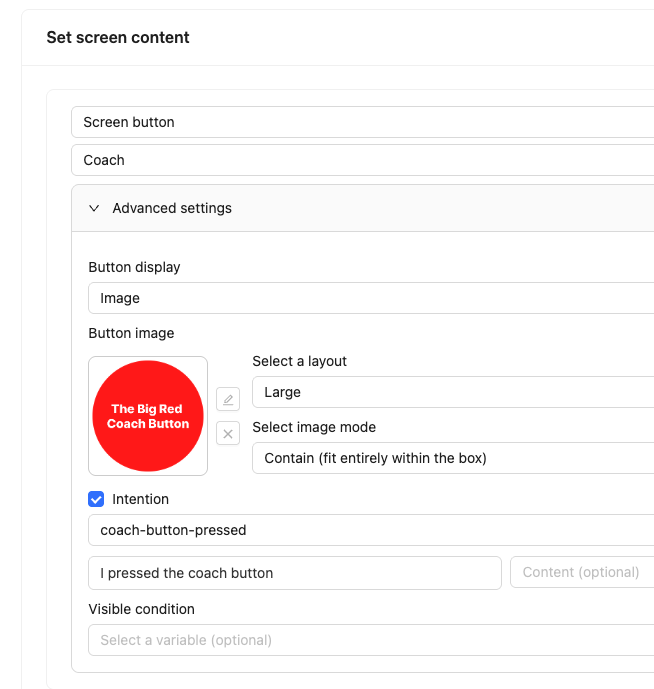
A button can also be displayed as an image instead of a regular button. The following display options can be configured:
- Layout – controls the size of the button:
small,medium, orlarge - Image Mode – controls how the image is rendered within its frame:
cover,contain, orstretch
As with all content elements, CoachStudio Designer shows a live preview on the right side so you can immediately see how your image button will look.
2.6 Triggering Actions via Buttons
All buttons can also be configured to send an intention to the server when tapped. This allows you to trigger backend-driven actions such as starting a Micro Dialog, triggering a coaching action, or logging a user interaction.
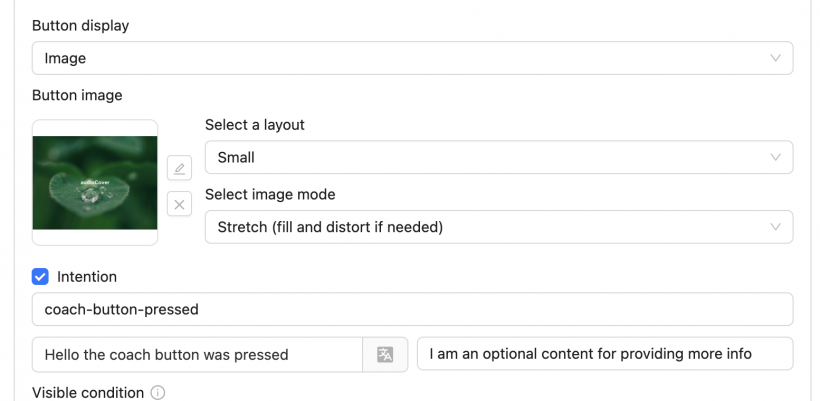
For the server to recognize the intention, you need to configure a corresponding rule in the Coaching Editor. Go to the Rules tab and click on "Execution on USER INTENTION".
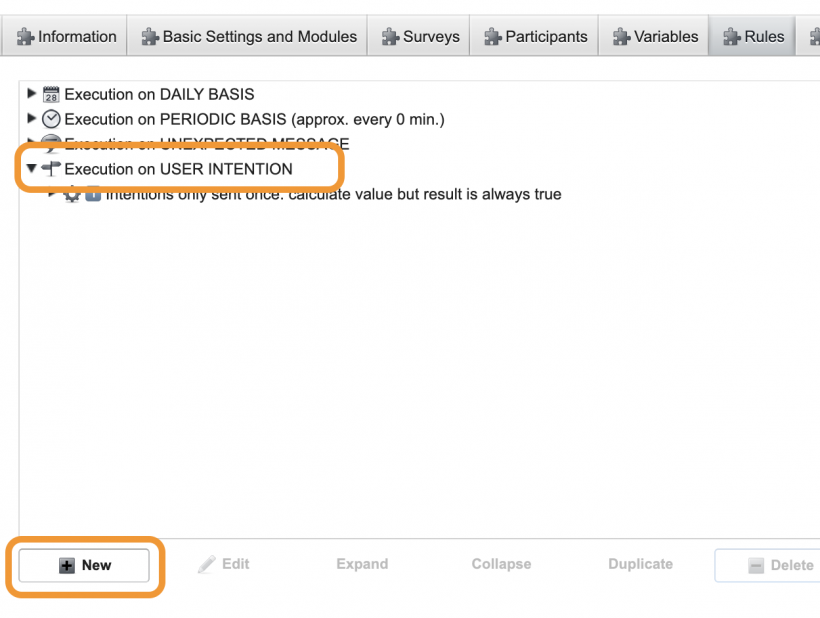
Click "New" to create a new rule. In the first input, enter the variable $participantIntention, select the rule text value equals, and enter your intention name — in this example coach-button-pressed. With just this, you can already start a Micro Dialog by selecting one from the dropdown. You can also configure the start time; by default it starts immediately.
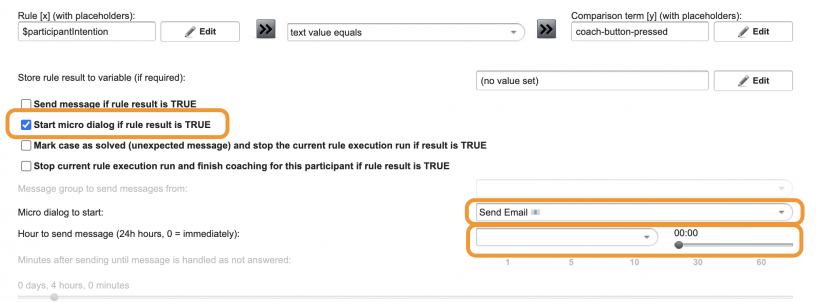
If you have configured optional content in the CoachStudio Designer alongside the button, you can save that content using the variable $participantIntentionContent within the same rule.

Important: Make sure to use the rule "create text but result is always true" — otherwise the content will not be saved into your variable.
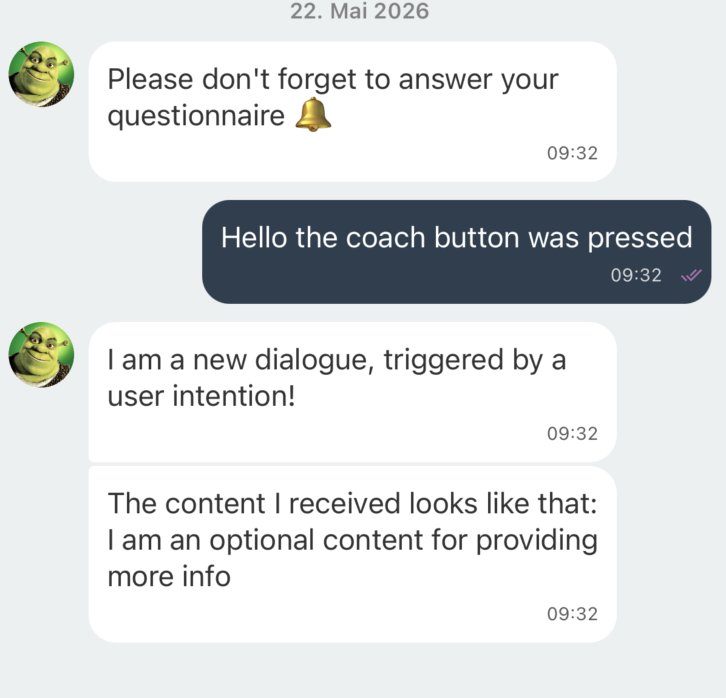
Once saved, the intention content is available for use in the coaching:
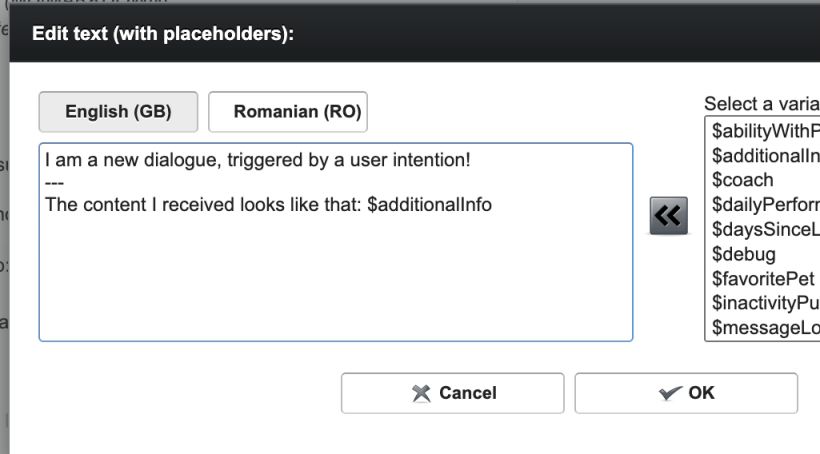
In the Coaching Editor itself, the corresponding bubble looks like this:
2.7 Complete Examples
The default more page with additional buttons to licenses listing and the privacy policy:
[
  {
    "type": "screen_button",
    "screenId": "account"
  },
  {
    "type": "screen_button",
    "screenId": "legal"
  },
  {
    "type": "screen_button",
    "screenId": "security"
  },
  {
    "type": "screen_button",
    "screenId": "licenses"
  },
  {
    "type": "screen_button",
    "screenId": "privacy-policy"
  }
]
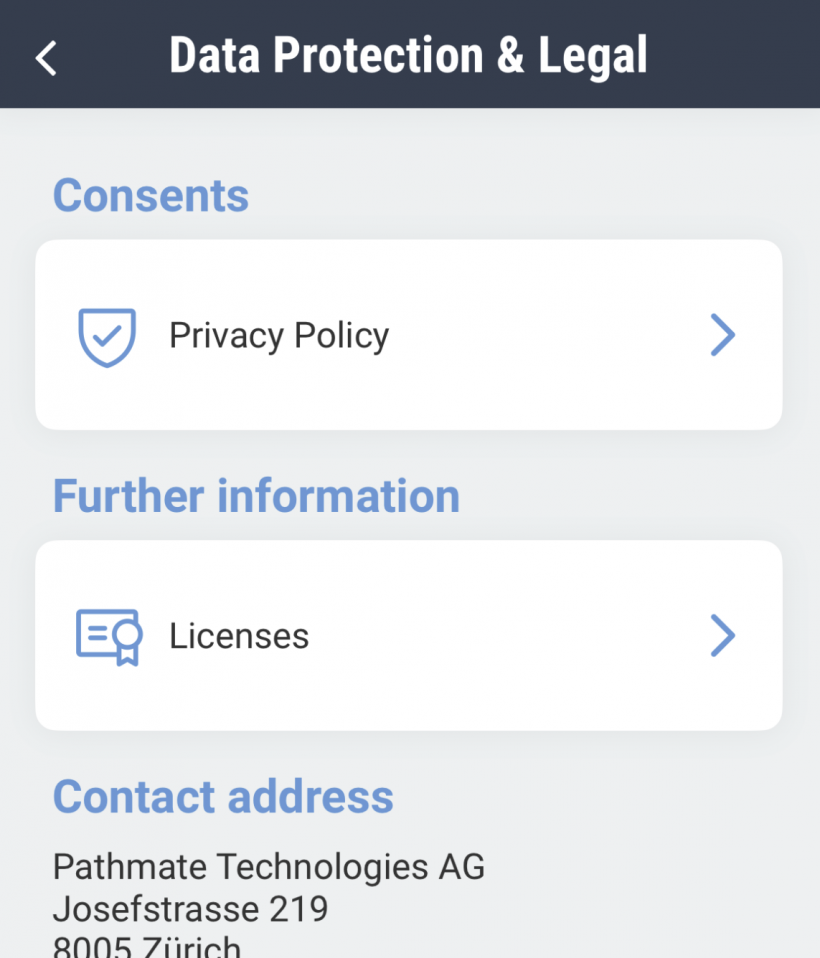
The default legal page:
[
  {
    "type": "md",
    "content": {
      "values": {
        "en_GB": "## Consents"
      }
    }
  },
  {
    "type": "screen_button",
    "screenId": "privacy-policy"
  },
  {
    "type": "md",
    "content": {
      "values": {
        "en_GB": "## Further information"
      }
    }
  },
  {
    "type": "screen_button",
    "screenId": "licenses"
  },
  {
    "type": "md",
    "content": {
      "values": {
        "en_GB": "## Contact address\nPathmate Technologies AG\nJosefstrasse 219\n8005 Zürich\nSwitzerland\n[www.pathmate-technologies.com](https://www.pathmate-technologies.com)\n[support@pathmate.app](mailto:support@pathmate.app)"
      }
    }
  },
  {
    "type": "md",
    "content": {
      "values": {
        "en_GB": "## Authorized representative\nDr Drik Volland, Managing Director\n## Entry in the commercial register\nRegistered company name:\nPathmate Technologies AG\nNumber: CHE-346.288.149\n## VAT number:\nCHE-346.288.149 MWST"
      }
    }
  }
]
3. Default Screens
3.1 Daily Plan
Last updated: May 2026
The Daily Plan is a built-in module of the Mobile Coach that allows users to manage medications and personal goals directly inside the app. It can be activated via the CoachStudio Designer and can also be controlled dynamically through coaching commands, enabling coaches or backend systems to create and remove tasks remotely.
To activate the Daily Plan, go to "Screens" in the CoachStudio Designer, add a new screen, choose "Default Screen" and select daily-plan.
Once added, users can independently manage their own entries, including:
- Medication reminders
- Personal daily goals
- Daily routines and health-related goals
- Task tracking with optional push reminders
3.1.1 Commands in the Coaching Editor
In addition to user-created tasks, coaches can create tasks programmatically through coaching commands.
Add Task Command
Tasks can be added using the following command:
add-task {
  "id": "task1",
  "title": "Very special Task",
  "startingTime": 1776677510,
  "iterationTimes": ["ANY"],
  "reminderActive": false,
  "intervalType": "single_time",
  "iterationDays": ["MON", "TUE", "WED", "THU", "FRI", "SAT", "SUN"]
}
Remove Task Command
Tasks can be removed using the following command, where TASK_ID is the identifier of the task to be removed:
remove-task TASK_IDExample:
remove-task task13.1.2 Command Configuration
The following properties are supported within the add-task command:
| Property | Required | Description |
|---|---|---|
id |
Yes | Unique identifier of the task. |
title |
Yes | Display title of the task shown in the Daily Plan. |
startingTime |
No | Unix timestamp defining when the task becomes active. If omitted or set to a past timestamp, the current client time is used. |
iterationTimes |
No | Array of time strings (e.g. ["14:00", "20:00"]). Each entry creates one item in the Daily Plan. Use "ANY" to display the task as a generic daily goal without a fixed time. |
reminderActive |
No | Enables or disables push reminders for the task. |
intervalType |
No | Defines the recurrence behaviour. Possible values: "daily", "selected_days", "single_time". |
iterationDays |
No | Required when using "selected_days". Defines on which weekdays the task appears. |
Interval Types
daily — The task appears every day.
"intervalType": "daily"selected_days — The task only appears on selected weekdays.
"intervalType": "selected_days",
"iterationDays": ["MON", "WED", "FRI"]
Supported weekday values: MON, TUE, WED, THU, FRI, SAT, SUN
single_time — The task is shown once and automatically removed after the user has confirmed it.
"intervalType": "single_time"Daily Goals Without Fixed Time
To display a task as a general daily goal rather than a scheduled one, use "iterationTimes": ["ANY"]. This is useful for open-ended goals such as:
- Drink enough water
- Exercise
- Read for 15 minutes
- General medication adherence
Scheduled Tasks
To create a task with one or more fixed times, provide the desired time entries as an array. The following example creates two separate entries in the Daily Plan:
"iterationTimes": ["08:00", "20:00"]3.1.3 Example Use Cases
Medication Reminder
add-task {
  "id": "blood-pressure-medication",
  "title": "Take Blood Pressure Medication",
  "iterationTimes": ["08:00"],
  "reminderActive": true,
  "intervalType": "daily"
}
Weekly Exercise Goal
add-task {
  "id": "exercise-goal",
  "title": "30 Minutes Exercise",
  "iterationTimes": ["ANY"],
  "reminderActive": false,
  "intervalType": "selected_days",
  "iterationDays": ["MON", "WED", "FRI"]
}
One-Time Appointment Reminder
add-task {
  "id": "doctor-appointment",
  "title": "Doctor Appointment",
  "startingTime": 1776677510,
  "iterationTimes": ["14:00"],
  "reminderActive": true,
  "intervalType": "single_time"
}