Service Channel News
Within our app, we are able to directly provide notifications that keep users informed about services offered by our partners. Delivered through in-app messages, they ensure that users receive timely and relevant information to enhance their app experience.
Steps
- Trigger Points in Coaching Dialogues: Event Triggers are required to place the SCN appropriately within the coaching story
- Creating and Editing Service Channel News: Service channels and individual SCN are created using our Pathmate Coaching Editor.
- Image Selection and Editing: To make SCN more effective, appealing and memorable, we use images tailored to a specific format.
- Testing the Implementation: Testing ensures a successful implementation of the newly created content.
1. Trigger Points in the Coaching Dialogues
To accurately place the Service Channel News at the right time during the chat, trigger points are used. When a specific trigger point in the chat is reached, the relevant information is presented.
But first, Event Triggers need to be created. To create Trigger Points, follow these steps:
- Open the Coaching Editor.
- Select
Coachingsfrom the left-hand menu. - Choose your Coaching.
- Open
Micro Dialogsfrom the top bar. - Select the dialogue in which you want to create Event Triggers.
- To create a new Event Trigger, click on
+New Eventunder the box.
Trigger points are selected based on:
Fit: The SCN should be aligned with the event trigger that best reflects its content. Ideally, this should be oriented towards a specific dialogue (e.g. health literacy lesson). Stick to the trigger that reflects the SCN in the most concrete way.
Example:
A health insurance company plans to offer a new lifestyle program for individuals with high blood pressure. To effectively reach the target audience, a suitable trigger for the SCN could be the blood pressure feedback provided after users complete the questionnaire.
If two event triggers are equally suitable for the content, choose the first one that appears in the coaching dialogue to ensure it reaches the maximum number of users.
Diversity: Avoid assigning multiple SCN to the same event trigger, as this can restrict the clear presentation of the messages.
2. Creating and Editing Service Channel News
When working with Service Channel News, we differentiate between creating a new channel and creating individual SCN within an existing channel. A new channel is created for a new customer when no SCN have been created yet. Individual SCN can be created within a newly established channel or added to an existing channel. This is typically done when a customer wants to expand their selection of SCN.
To create a new channel, follow these steps:
- Open the Coaching Editor.
- Select
Events & Actionsfrom the left-hand menu. - Create a
New Coaching Event Group. - Edit and name the new channel.
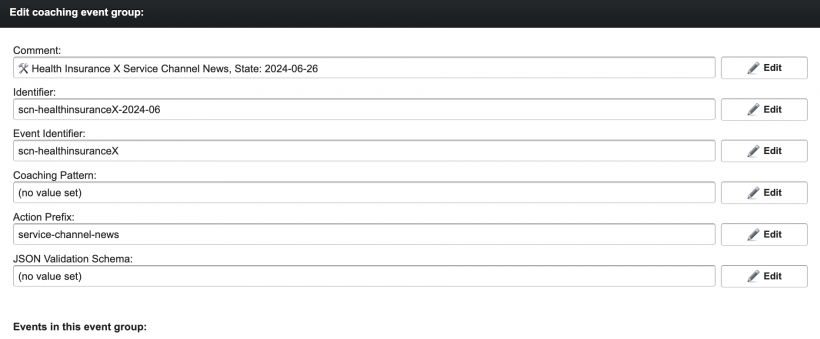
Comment: This field should include the name of the channel, followed by the date of editing.
Identifier: This information helps the system link to the corresponding health insurance company. The field is filled in by Pathmate, so please do not edit it.
Event Identifier: This information helps the system link to the corresponding health insurance company. The field is filled in by Pathmate, so please do not edit it.
Coaching Pattern: The name of the Coaching can be filled in by users.
Action Prefix: This field should always be filled with service-channel-news.
JSON Validation Schema: Please do not edit.
To create individual SCN, adhere to these steps:
- Chose the channel in which you want to create the SCN and open it.
- Create a new SCN by selecting
+Newunder theEvents in this event groupbox. - Fill in the name of the SCN in the
commentfield, using a consecutive numbering system for the individual SCN. - Specify the Event Trigger in the
Event Identifierfield. - Create the content of the
Actionfield according to the following scheme:
{
    "id": "insert number of the SCN",
    "category": "insert category",
    "title": "insert headline",
    "text": "insert subline",
    "button": "insert button label",
    "url": "insert link or phone number",
    "deleted": false,
    "popup": false
}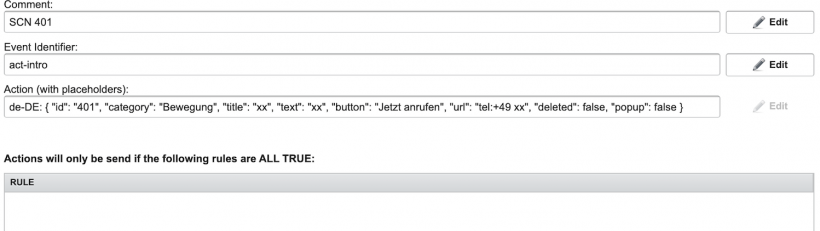
- If necessary, specify rules with corresponding variables in the bottom
RULEfield.
Defining Rules:
A significant amount of Service Channel News is relevant only to specific groups of users. By using variables with concrete rules, we ensure a personalized presentation of information and avoid overwhelming users with unnecessary input. These variables are integrated into the SCN, similar to Event Triggers. However, to be effective, variables must be specified within a rule.
For information on how to create variables, click here.
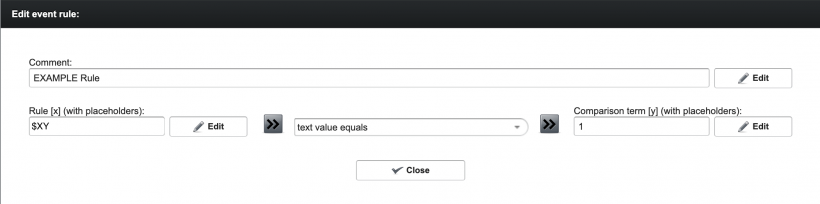
- Create a new rule by clicking on
+Newunderneath theRULEbox. - Optionally, name the rule in the
commentbox. - Enter your variable in the first field (
Rule [x]). - Select the desired rule from the list in the middle field.
- Fill in the comparison term (text, number or variable) in the last field (
Comparison term [y]).
Example:
Let's revisit the initial example. A health insurance company offers a lifestyle program specifically designed to help users with high blood pressure. However, this offer should only be displayed to those who actually have high blood pressure when blood pressure feedback is given (hypertension: variable equals 1, no hypertension: variable equals 0).
The rule is specified accordingly: $XY text value equals 1
For a detailed overview of existing rules, click here.
4. Image Selection and Editing
Images for Service Channel News should have the following settings: Width: 800 pixels, Height: 450 pixels
For information on how to select and edit images, click here.
5. Testing the Implementation
The final step in creating Service Channel News is testing in the respective app. Follow these steps to ensure successful implementation:
Step 1: Activate the channel where changes were made in the Pathmate Editor. To do this, click on the channel and press the Switch Status button. The status will change to active mode, visible on the left-hand side.
Step 2: Open your development app.
Step 3: Navigate to the relevant sections to check correct placement of the SCN.
In case of discrepancies, remember to deactivate the channel before editing again.