Questionnaires
Last updated: March 2026
Questionnaires allow you to create structured exercises, interactive learning elements, or surveys that can be displayed in a clear questionnaire format. Users no longer need to write JSON manually – everything can be created and managed directly in the CoachStudio Designer.
1. Creating a Questionnaire in the CoachStudio Designer
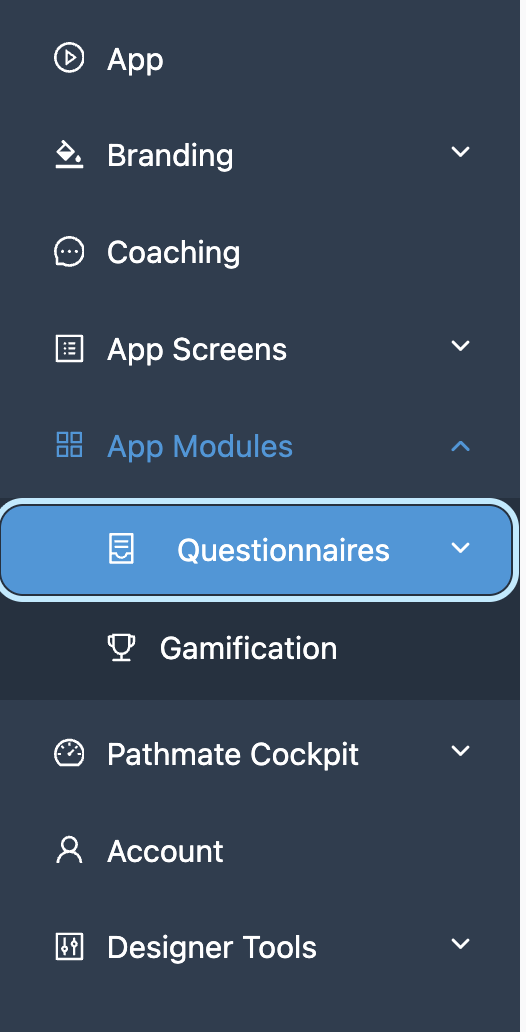
- Navigate to "App Modules" and the Questionnaires tab in the CoachStudio Designer.
- Click Add Questionnaire.

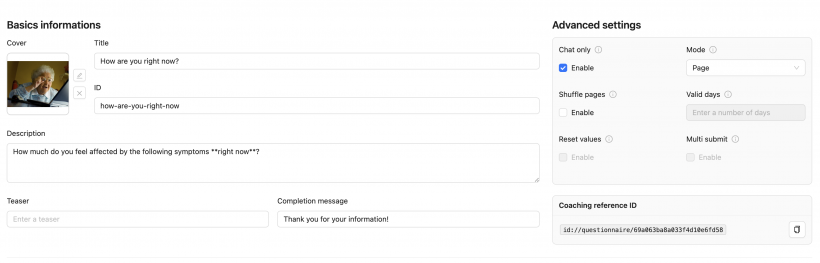
- Enter the general information for your Questionnaire:
- Title
- ID (unique identifier for the Questionnaire)
- Description
- Teaser
- Completion Message
- Mode (Page or Chat-Only)
- Shuffle Pages
- Reset Values
- Multi-Submit
- Valid Days
For further information, have a look at chapter 4 "Base Configuration"
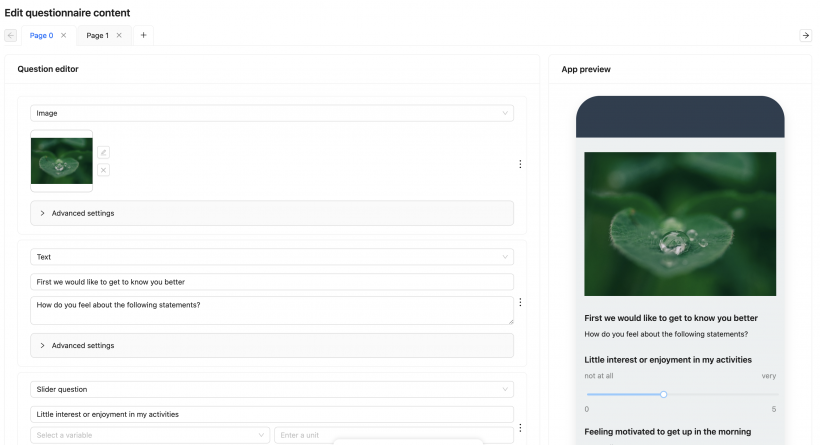
- Once the Questionnaire is created, you can add and edit questions using the Question Editor.
2. Adding Questions
For each page in your Questionnaire, you can add multiple question types and media:
- Add a Page → Then click Add a Question.
- Choose the type of content to display on this page:
- Image: Select an image from Media Resources. In Advanced Settings, you can adjust the size and layout.
- Text: Add descriptive text or instructions below images or on a page by itself.
- Stage Text / Stage Text Bullets: Group questions or provide section headers.
- Slider: Capture numeric inputs like percentages or ratings.
- Text Input: Collect open-ended responses.
- Select-One / Select-Many: Offer single or multiple choice questions.
- Apply conditions if you want a question to appear only under specific circumstances (e.g., based on a previous answer).
3. Formatting Text
You can format the text in the Questionnaire to improve readability and structure:
- Bold:
**text**or__text__ - Italic:
*text*or_text_ - New Line: Press Enter for a new line. For a new paragraph, leave an empty line.
- Bullet List: Start lines with
-,*, or+followed by a space. - Numbered List: Start lines with
1.,2., etc., followed by a space. - Link:
[Link Text](URL) - Blockquote: Start a line with
>. - Header: Start a line with
#for H1,##for H2, etc.
4. Base Configuration
At the top of the Questionnaire you can find the base configuration, which allows you to define the following settings:
id: Unique identifier for the Questionnaire. Use a dynamic ID if the Questionnaire is to be answered multiple times (e.g., include the date).version: Specific version or iteration of the Questionnaire.title: Name of the Questionnaire.complete: Message displayed after the Questionnaire is completed.teaser: Brief summary or introduction.mode: Layout of the Questionnaire:Page: Organize questions across multiple pages.Default: All questions appear on a single page, displayed sequentially.
shufflePages: Randomizes page order whenmodeisPage.description: Detailed instructions or description.cover: Optional image or visual for the Questionnaire.validDays: Number of days the Questionnaire is accessible.multiSubmit: Allow multiple submissions (trueorfalse).resetValues: Reset progress if a participant restarts (trueorfalse).WriteToVariables: Store answers in variables for use in later coaching steps.
5. Saving Answers to Variables
Questionnaire responses can be saved to variables for use in subsequent coaching steps.
Variables inside a Questionnaire are initially local to the Questionnaire itself. This means that they exist only within the scope of the Questionnaire unless they are explicitly mapped to variables used in the coaching.
This separation allows Questionnaires to handle data internally without unintentionally modifying global coaching variables.
5.1 Variable Scope
It is important to understand the difference between Questionnaire variables and Coaching variables.
Local Questionnaire Variables
Variables defined inside a Questionnaire are local by default:
- They exist only within the Questionnaire.
- They store participant answers during completion.
- They are not automatically written to coaching variables.
This means that responses collected in the Questionnaire remain internal unless explicitly mapped to external variables.
Coaching Variables
Existing variables from the coaching can also be read inside the Questionnaire.
However:
- If a variable with the same name exists in both the Questionnaire and the coaching,
- updating the variable inside the Questionnaire does not automatically overwrite the coaching variable.
To transfer values from the Questionnaire to the coaching, a binding must be explicitly defined.
5.2 Define Variables
In the CoachStudio Designer, list the variables you want to use inside the Questionnaire under Manage dynamic variables and bindings in the Questionnaire settings.
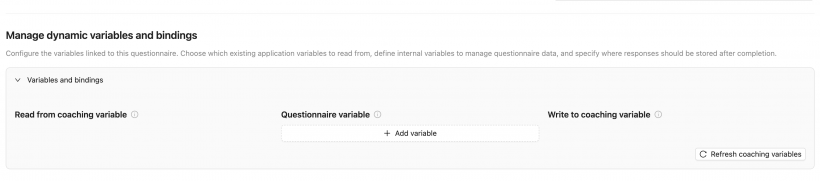
- These variables can store participant input or fixed values.
- You can also read existing variables from the coaching.
- Ensure variable names are unique to avoid conflicts.
Variables declared here become available for use inside the Questionnaire editor.
5.3 Writing Questionnaire Variables to Coaching Variables
Values stored in Questionnaire variables are not automatically transferred to coaching variables.
If responses should be reused later in the coaching flow, you must explicitly define variable bindings.
This is done in Manage dynamic variables and bindings within the Questionnaire settings.
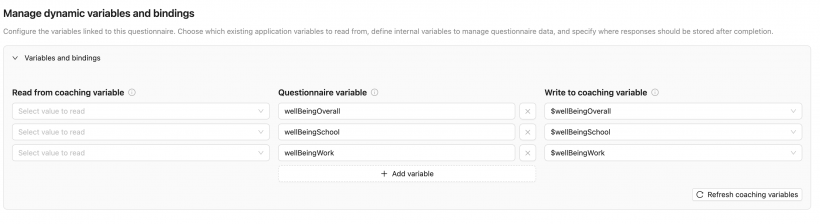
Through these bindings you can:
- map Questionnaire variables to existing coaching variables,
- ensure that values are written back after the Questionnaire is completed,
- control exactly which values leave the Questionnaire scope.
Without such a binding, the values remain local to the Questionnaire.
5.4 Using Variables in Questions
When creating or editing questions inside the Question Editor, you can store answers in variables.
During question configuration:
- Select the question type (e.g., Slider, Text Input, Select-One).
- In the question settings, locate the Select Variable field.
- Choose one of the variables previously defined under Manage dynamic variables and bindings.
The participant's answer will then be stored in the selected variable during Questionnaire completion.
This configuration is done in Edit Questionnaire Content in the CoachStudio Designer.
5.5 Conditions Based on Variables
Variables can also be used to control conditional logic within the Questionnaire.
In the Advanced Settings of a question or content block, you can define Conditions that determine when an element should be shown.
Conditions allow you to:
- display questions only when certain answers were given earlier,
- skip irrelevant sections,
- dynamically adapt the Questionnaire flow.
Conditions can be applied to:
- questions,
- text elements,
- images,
- or other content components within a Questionnaire page.
This enables branching logic and adaptive Questionnaire flows based on participant responses.
You can look up for more information in our chapter Rules
5.6 Make Variables Writable
If you want Questionnaire responses to update variables used elsewhere in the coaching, the target variables must allow writing access.
- Navigate to Variables in the Coaching Editor (quickly reachable over "Coaching", click on "Jump to CoachStudio Editor").
- Click +New and add the variable (e.g.,
$fulfillmentPercentage). - Set Access to
Manageable by Service.
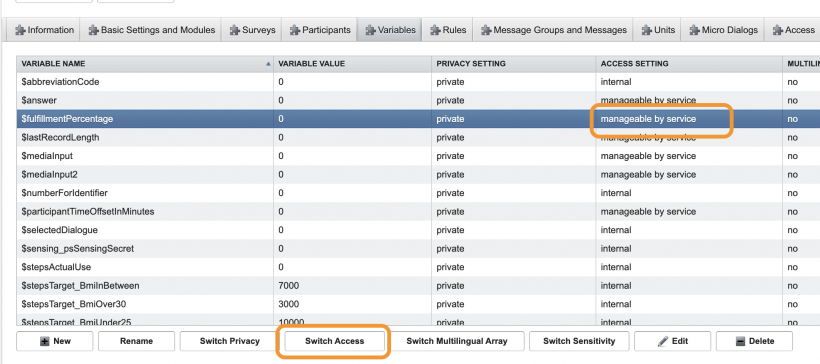
Only variables with the appropriate access settings can be updated through Questionnaire bindings.
6. Advanced Settings
- Completion Message: Define what participants see after submitting the Questionnaire.
- Shuffle Pages: Randomizes page order for participants.
- Reset Values: Decide whether progress should reset if a participant restarts.
- Multi-Submit: Allow participants to submit multiple times.
- Valid Days: Set a timeframe during which the Questionnaire is accessible.
7. Linking Questionnaires in the App
Questionnaires can be integrated into the chat in different ways depending on how participants should access them.
Before integrating a Questionnaire into a chat flow, it is important to understand how Questionnaires are referenced within the system.
Each Questionnaire created in the CoachStudio Designer has two identifiers:
- Questionnaire ID – The unique identifier defined when creating the Questionnaire. This value must be unique across the coaching and can be a number (e.g.
1) or a descriptive string (e.g.wellbeing-questionnaire). - Coaching Reference ID – the identifier used by the coaching system to reference the Questionnaire.
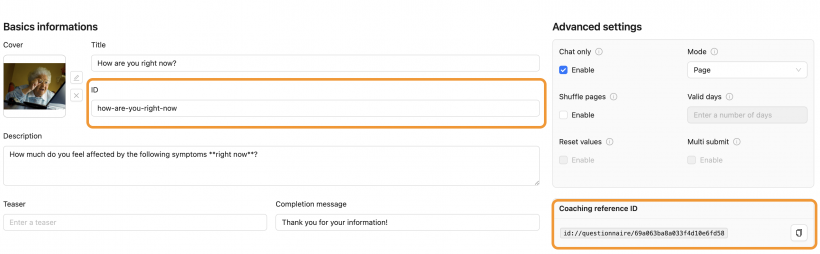
The Coaching Reference ID is used inside the coaching flow to register the Questionnaire so it can be accessed by the chat.
Integration Options
| Option | Access Method | Commands Required |
|---|---|---|
| Chat Button Only | Button inside chat | questionnaire + open-component |
| Questionnaire Button Only | Header overview only | questionnaire |
Choosing the appropriate integration method depends on how tightly the Questionnaire should be connected to the chat flow.
Multiple Questionnaires can be linked at different points within the chat flow.
7.1 Option 1 — Questionnaire Only via Chat Button
In this setup, the Questionnaire is only accessible through a button displayed inside the chat.
Participants cannot access it through the Questionnaire overview in the chat header.
This is useful for exercises that should be completed exactly at a specific moment in the conversation.
Required Commands
First activate the Questionnaire by creating a new message and activate the command feature:
questionnaire [Coaching Reference ID]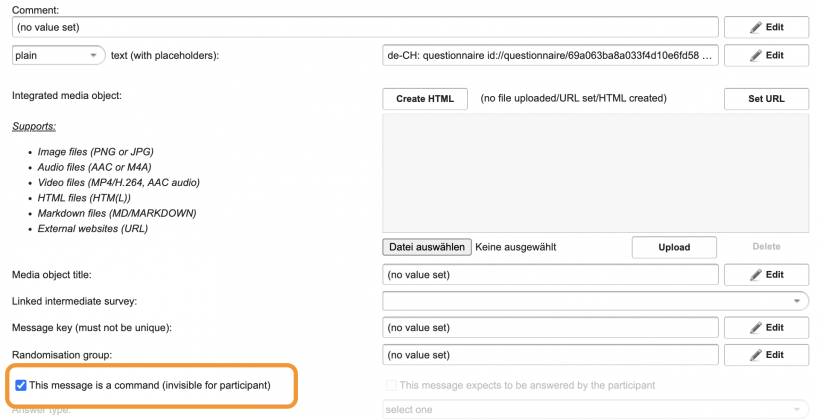
Then create a chat message expecting an answer and define the button:
open-component:questionnaire
[Questionnaire ID]:[Button Title]
Example:
open-component:questionnaire
stress-check:Start Stress Check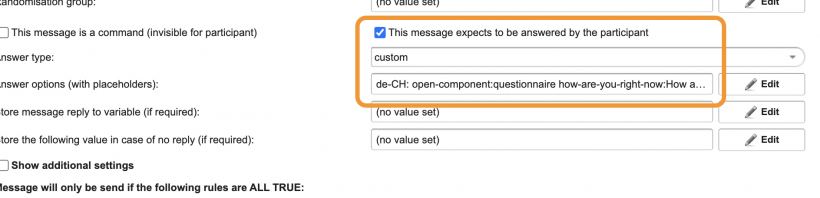
The chat will remain blocked until the participant completes the Questionnaire.
Because the Questionnaire is only accessible via the chat button, participants typically complete it once within the flow.
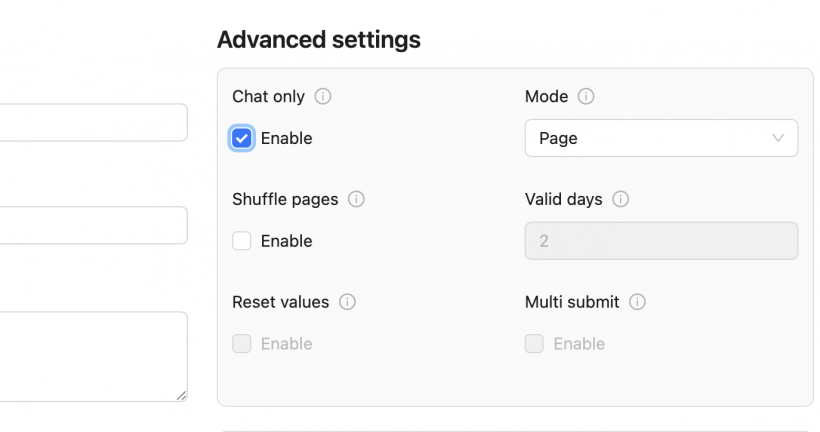
Required parameters in the CoachStudio Designer
Make sure that you have the "chat only" feature activated
7.2 Option 2 — Questionnaire Only via the Questionnaire Button
In this setup, the Questionnaire does not appear as a button in the chat.
Instead, it is only accessible through the Questionnaire button in the top-right corner of the chat interface, which opens a list of available Questionnaires.
This creates a central overview of multiple Questionnaires that participants can open independently.
Required Command
Only the questionnaire command is required:
questionnaire [Coaching Reference ID]Once activated, the Questionnaire will appear automatically in the Questionnaire overview.
No open-component command is necessary.
This approach is useful when:
- several Questionnaires exist in parallel
- participants should choose when to complete them
Questionnaires are not tied to a specific message in the chat flow.
7.3 Questionnaire Overview in the Chat
If Questionnaires are available via the header button, participants can open a Questionnaire overview screen.
This screen lists all available Questionnaires and allows participants to select and complete them.
Which Questionnaires appear in this overview depends on:
- when the questionnaire command was triggered
- whether the Questionnaire is configured with chatOnly
- whether it is still valid according to validDays.
8. Notes
- Questionnaires are now fully intuitive and can be created entirely in the CoachStudio Designer – no JSON editing is required.
- Media, text, and conditional logic can all be added through the interface.
- Variables and responses from the Questionnaire can be stored for use in later coaching steps or interventions.