Editing Pictures
The images should have the following maximum size, whereby you should always try to reach 1500 in width.
Width: 1500 pixels Height: 2000 pixels
- Images that are too large can be reduced in size (adjust to the target value), images are never enlarged.
- All images used are collected in their original format in a folder.
- Photos / people / nature / objects are saved as jpg (because the file is then smaller).
- For graphics, png is used (because it also makes monochrome areas look good).
- Images for Service Channel News or Questionnaires should have the following settings: Width: 800 pixels, Height: 450 pixels (adjust via Gimp, see below)
"GIMP" helps:
brew install --cask gimpImage editing with GIMP (free for Mac):
Function: To get images in the appropriate ratio (width: 800 pixels, height: 450 pixels) without losing image quality
Step 1: Drag the image into the program
Step 2: If the question is displayed whether the color profile should be converted = CONVERT
Step 3: Fix the aspect ratio on the right bar (800x450) and cut out the image section
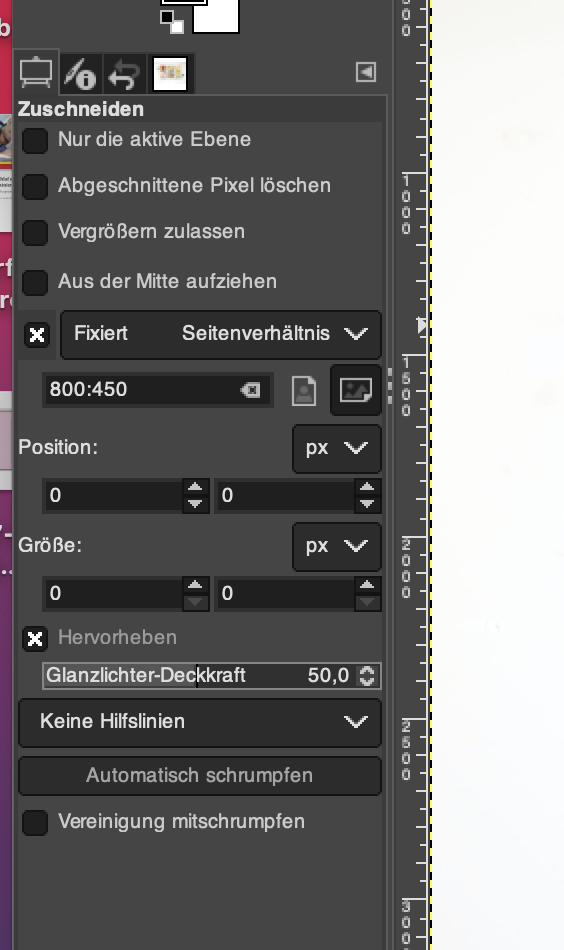
First select the format and only then check the box next to fixed aspect ratio.
If you select a section of the image, it will be adjusted to fit the format. To finalize the crop, press Enter.
Step 4: Under the "Image" tab (top), select the "Scale image" area
Step 5: To scale, enter 800px for the width and press Enter, the height of 450px should be displayed automatically (see image 3). Then click on "Scale".
Step 6: Under the "File" tab (top), select the "Export to..." area
Step 7: Rename the image accordingly (e.g. 416-de-DE; original should be retained) and "Export".
Step 8: The "Export image as JPEG" window opens (see image 4). The quality should be corrected to 100%
Step 9: After exporting, the size of the image must be reduced using ImageOptim (free for Mac):
- For png files: In ImageOptim, select Settings and Quality → For "Enable lossy compression": do NOT check the box
- For jpg files: Select settings and quality in ImageOptim → For "Enable lossy compression": check the box and set JPEG quality to 90%
The images used (sections of images) must be saved in the same folder as the info card.
Images are inserted in the Markdown file:

- The square brackets describe what is to be seen [Alt Text]
- The name of the image is given in the round brackets: (IC name of the info card name of the image.jpg)
- HTML is created from the Markdown (this is done automatically later by a script → Ask Anna/Andreas)